Fedelta
Why use both Lightyear & Fedelta?
Simple. Invoices that arrive in Lightyear like this...
... can be imported into Fedelta, like this...
... saving the team a lot of data entry!
Fedelta Setup
Please contact Fedelta Support to request activation of the import function required to accept Lightyear-populated files. The 'how it works' is simple, Fedelta will match (or create) a 'Purchase Order' and 'Receive Order' when purchases are imported from Lightyear's populated file(s). Once Fedelta have activated the purchase import function for you, please continue through these simple steps...
Export your Suppliers from Fedelta
You should prepare a .CSV (comma delimited) file from Fedelta containing your suppliers, ready to import into Lightyear:
Column A = Supplier Name
Lightyear Setup
On the left hand ribbon, navigate to Settings > Company Settings > Inventory Settings (if you cannot see this option, please follow these instructions and if problem still persists, ask an admin on your Lightyear account to review your permissions).Select Fedelta from the dropdown:Set your Default Product Units
For users of Fedelta, the default Product Unit Type should always be 'Units' as their system uses factoring of
extracted cost and product codes to recognise how the stock is being invoiced... in short, it's very smart.
Set Mandatory Export Fields
By default, Lightyear will prevent you from exporting if your bills are missing a Case Qty or Unit Type, but this can be changed!
In Inventory Settings, click into the Inventory/POS Settings option.
Here you can mix and match the Mandatory Export Fields between these options:
- Case Qty
- Unit Type
- POS Code
Click confirm.
Any bills added to inventory from this point will check that the mandatory fields are met.
These will be flagged in Panel 1 with a warning icon  . Panel 2 will highlight the fields with mandatory data missing, and users won't be able to export without adding in the missing information.
Once you have made the necessary adjustments, click Save and you will then be able to export.
Supplier Cards
This is a mandatory step because it makes your import routine easier, however Fedelta does not require the name of the supplier within Lightyear’s exported file. You’re adding a supplier name to identify each exported file more easily:
221219Duff_Brewery_Pty_Ltd.csv
Where the first 6 numbers are the delivery date DDMMYY and the next string is the name of the supplier as Fedelta knows it to be. The “.CSV” is the file type.
Navigate to Settings > Inventory Settings > Supplier Cards > Edit
On the top right, click the 'Upload CSV File' button.

Locate the CSV file you exported from Fedelta, select this and click 'Open' in the dialog box.
Lightyear will ask you ' Does the uploaded file contain a header row? ' If your CSV file has a header (normally containing a label) in row 1 then click Yes . If the CSV file does not, then click No .
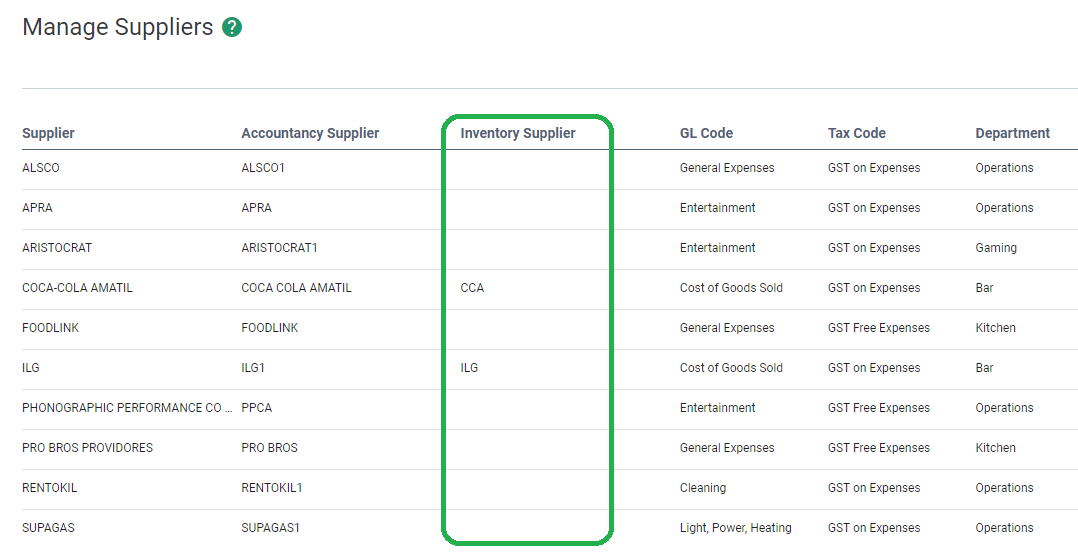
Associate Fedelta Supplier Cards with Lightyear Supplier Cards
On the left hand ribbon, click Suppliers:
Select each supplier you would like to associate with Fedelta and click the edit icon on the far right.
Assign an ‘Inventory Supplier’ from the relevant dropdown list (listed in this dropdown are the suppliers you uploaded from Fedelta).

Sending your bills to the Inventory Tab in Lightyear
How do I import my purchase file into Fedelta Back Office?
On the relevant machine, open Fedelta Back Office.
Along the top menu, select the menu - Stock Control > Invoices > Import Invoice File.*
From the Supplier dropdown, select 'Invitbox'
*If this option does not exist in your Fedelta Back Office, please reach out to Fedelta support to get this activated.

At the time of publication, Fedelta were working on changing the supplier name from the now closed 'Invitbox' service to 'Lightyear', keeping their system up to date.
Using this search box, enter the path of the Lightyear populated file for import, or click the icon to the right to find the saved location of your purchase file:
Our recommended browser, Google Chrome will send export files to the 'Downloads' folder by default, to change this
please refer to this help article.

Fedelta offer a 'Save as pending' option. This allows for the detail of invoices to be imported to a state where they can be edited prior to import. This is recommended if you would like to review/edit the data prior to updating your inventory.
Once you have selected your file, click 'Read File' (checking the 'Save as pending' box if desired). Fedelta will display the contents of the file on screen as follows, where the 'Override Outlet' column should be used to choose the location where you would like the stock updated:
If 'No Order' is displayed in the 4th column, a decision should be made by the user:
The second last column labelled 'Avg Misc' contains a checkbox. This function spreads additional costs (like freight, finance fee etc) across the products/services in the file. Select this if you would like to spread these charges across multiple items.
Finally click the 'Import' button on the lower left corner to import your purchases, creating a Purchase Order and Receive Order if it doesn't already match the PO sent:
Tips, Tricks, Notes:
Please ensure your Fedelta items have a 'Supplier Inventory Code':
- This is how the supplier knows the item.
- This is what Lightyear will extract from the PDF, and send to Fedelta.
- If supplier does not use product codes, Lightyear create maps that extract the Description as the Product Code (thus remains a unique ID that generally does not change).
Check out our
to stay up to date
Related Articles
Xero Integration Setup Guide
Connecting to Xero Because Xero and Lightyear are both cloud-based, set-up and connectivity between the two systems is seamless. Here's how. From the Navigation Pane, head over to Settings > Accounting Software > select Xero from the dropdown menu > ...Choosing "Other" as your Inventory Software
While Lightyear supports many different types of inventory software through a predefined export, you may be using one that isn't yet formally supported. Well, good news! If your inventory software supports either a .csv or .txt upload, you can now ...Sage Intacct Integration Setup Guide
Connecting to Sage Intacct As Sage Intacct and Lightyear are both cloud-based, set up and connectivity between the systems is seamless. Here's how! Prerequisites Subscribe to Web Services You will need to add your Company's Sender ID to the Sage ...Importing into BePoz
Bepoz Stock Control system can import invoices from different suppliers automatically. However, there are some setup fees involved including the authorisation of the Purchasing Link Module. Lightyear is a system that can generate line item inventory ...Choosing Other as your Accounting software
While Lightyear supports many different types of accounting software, either through a direct API or a predefined export, you may be using one that isn't yet formally supported. Well, good news! If your accounting software supports either a .csv or ...