Iplicit Integration Setup Guide
Connecting to iplicit
As iplicit and Lightyear are both cloud-based, set up and connectivity between the systems is quick and easy. Here's how:
Prerequisites
Creating a User
When you connect Lightyear to iplicit, you'll be asked to input a specific username. For this, we would recommend creating a separate user within iplicit to do the connection. This will allow any user from within Lightyear to make the connection and generate/update API Keys as necessary.
Within iplicit, go to User Accounts and click New.
Give the user a Username, License and Name.
In the Roles area, you will need to select the following Roles and Access:
- All Access
- Contact Account: Delete
- Contact Account: View
- Cost Centre: Admin
- Cost Centre: View
- Department: View
- GL: Admin Group
- Purchase Order, GRN, Invoice, FX, Payment & Supplier Advanced Entry Group
- Supplier: Admin
- Supplier: Advanced Entry Group
- Supplier: Delete
- Supplier: Entry
- Tax Authority: Read Only
- Tax Authority: View
- Tax Code: Read Only
- Tax: Read Only
Once you have done this, and filled out any other information as necessary, click Create.
When the User has been created, Set Password for the user. This will allow you to correctly generate the API Key as below.
Generating an API Key
With the user created above or an existing user, go to the API Keys tab.
Click New and enter a Description for the Key.
Set the Validity Days as required, this will default to 90, but can be adjusted as necessary. Then click Submit.
 Warning: After the 90 days have passed, you will no longer be able to import/export from Lightyear to iplicit. At this point, you will need to go back into this user, generate a new API Key and re-connect to iplicit again.
Creating the Attachment URL
This step will allow you to see a URL redirecting users back to Lightyear to find the PDF copy of the invoice/credit note.
Within iplicit, head over to the Document Types area and find the Purchase Invoice: Direct and Purchase Credit Note that have been created in your iplicit account.
Double click on the Invoice and click Edit.
Go to the Custom Fields tab and click Add.
Enter the following information into the relevant fields:
Property Name: ImageURL
Type: Text (*)
Component: Hyperlink
Caption: Image URL
Once created, click Save.
 Please Note: You will need to repeat this step again for the Credit Note side.
Establishing the Connection
Within Lightyear, in the left Navigation Pane, head over to Settings > Accountancy > select iplicit > Connect.
A popup modal will appear asking you to enter three key pieces of information:
User Name: the username of the user doing the connection
Domain: the domain used to login to your iplicit account
API Key: the API Key generated from the previous step
When you have filled this out, click Connect.
If you have multiple iplicit Legal Entities, select the relevant one for the Lightyear account being connected. If you only have one Legal Entity, there should only be one in this dropdown list.
Once selected, click Set Entity.
The last step is to select the set up you have within your iplicit account (don't worry, this can be changed later). More information about what each option is can be found below!
When you have changed the settings to your liking, click Confirm & Connect.
Lightyear will automatically sync the following data back from iplicit which are required to process your payable bills:
- Cost Centres
- Departments
- iplicit Suppliers
- Chart of Accounts
- Tax Rates
Syncing of your Lightyear and iplicit account is now complete and you will be connected.
If you do nothing else in this section, please ensure you skip ahead to set your default Tax Rates before you move on. Trust us, it will make your life SO much easier when you get to processing your Invoices and Credit Notes.
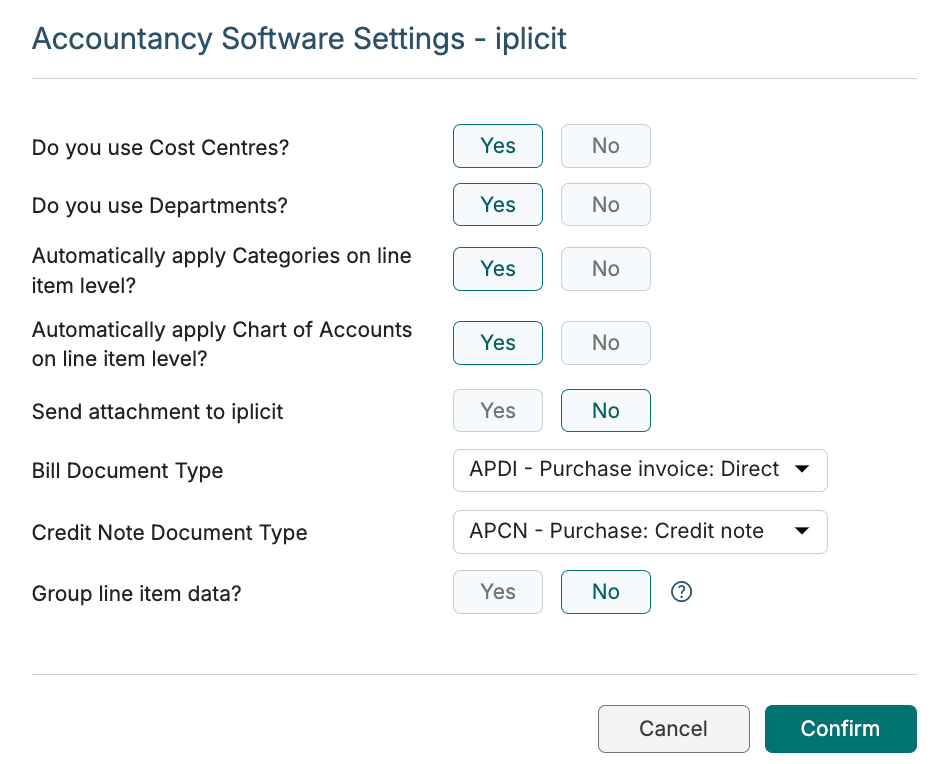
Software Settings
Customise your iplicit settings by selecting Accountancy Software Settings. In this section, you can:
- Turn on Departments or Cost Centres
- Enable automatic application of Categories on line item level
- Enable automatic application of Accounts on line item level
- Send attachment to iplicit
- Set the Bill Document Type
- Set the Credit Note Document Type
- Enable Grouped Data
Do you use Departments/Cost Centres?
Select up to 2 Categories to use within Lightyear.
Turning any combination of these Categories to Yes will sync the data across from iplicit.
Automatically apply Categories on line item level?
- Yes - Save time by coding it in Lightyear, and we’ll remember the next time we extract the line item that you’ve coded the supplier lines to.
- No - Keep these blank for you to code individually.
Automatically apply Chart of Accounts on line item level?
- Yes - Save time by coding it in Lightyear, and we’ll remember the next time we extract the line item that you’ve coded the supplier lines to.
- No - Keep these blank for you to code individually.
Send Attachment to Iplicit
If you want to send the PDF to iplicit alongside the extracted data, you can set this to Yes.
When Yes, you'll see two additional settings for Bill Attachment Group and Credit Note Attachment Group. Please select these from the dropdown menus available.
These need to be populated in order for the attachment to appear in the correct area when a bill or credit note is exported to iplicit.
Bill Document Type
Select the Document Type that an Invoice will be exported as.
In our example, we use APDI - Purchase Invoice: Direct, you may have something similar in your iplicit.
Credit Note Document Type
Select the Document Type that a Credit Note will be exported as.
In our example, we use APCN - Purchase: Credit Note
Group line item data?
Turning this on will allow you to export Grouped Account data, rather than line item data. For the full article on this, click here.
Iplicit Suppliers
Iplicit Suppliers are what Lightyear uses to connect a Supplier within Lightyear to a Supplier within iplicit. Any existing Suppliers in iplicit will appear here after a successful connection.
When you connect to iplicit, by default, your list of existing iplicit Suppliers are synced to Lightyear.
- Supplier Name
- Country Code
- Currency
- Sort Code
- Bank Account Number
- IBAN
- BIC
- Default Tax
If you want to remove a Supplier, simply click the red trash can icon  on the right of each line.
Create New iplicit Suppliers
If you find you don't have a Supplier set up in your iplicit account and Lightyear, you can easily create this within Lightyear.
To do this, click the +Supplier button  in the top right of iplicit Suppliers. The following modal will display:
In the Supplier Name field, enter the name of the Supplier as you would like it to display in both Lightyear and iplicit. Currency and Country are those relating to the Supplier Supplier Group is whichever accurate Group that is set up within your iplicit account. Once all required fields are entered, click Confirm.
The Supplier will be created in both Lightyear and iplicit.
If you need to make any changes or update the details of the Supplier within iplicit, you can update this in Lightyear by clicking the Import Suppliers  button.
Please Note: If you create a Supplier in Lightyear, when you update the details in iplicit you must click the New Supplier Form option in the Supplier tab before saving.Updating Lightyear Suppliers
After importing your iplicit Suppliers, you can quickly create Lightyear Suppliers alongside this. While in Accountancy > iplicit Suppliers, click the Update Lightyear Suppliers button  . You will be given the option to Create & Override or Create Only New.
Create & Override will create new suppliers that don't exist within Lightyear, and update the information with what's set up in iplicit.
Create Only New will create new suppliers that don't exist within Lightyear, without updating any current suppliers.
Suppliers in Lightyear will then be created with the information from iplicit, automatically populating the Supplier Name, Country, Currency, Default Tax Code and Bank Details.
Missing Country Codes? Click here to fix this.Chart of Accounts
Account Codes are all imported to Lightyear when you link your iplicit account.
If you make any updates to your Accounts within iplicit, you can go to Accountancy > Chart of Accounts in Lightyear and click the Import from iplicit button  to update and refresh your list.
If you wish to reduce the number of Account Codes that Lightyear presents to you in the dropdown lists, uncheck the tick boxes to the right of each Account Code. Don't forget to Save!
Before you leave, set a Rounding Account at the bottom of the page. This will automatically code any automated Rounding Rows to the specified Account Code.
Set a Default Tax Rate
When you initially connect to iplicit, Lightyear will automatically import all your iplicit defined tax rates.
You will need to choose two iplicit tax rates to act as the defaults for Taxable and Non-Taxable items. Lightyear will use these defaults to send the relevant tax code to iplicit if a line is taxed/tax free. You also have the option to manually assign a different tax code to each document, or set specific tax codes to apply to each Supplier.
To choose your 2 defaults, go to Accountancy Software > Tax Rates.
The below image shows what a typical set up looks like - we have selected the 2 standard tax rates for the UK (Standard 20% and Exempt 0%).
Set a Default Tax Rate against a Supplier
Usually the Supplier Default Tax Rate is left blank, which allows the 2 defaults set above to work throughout Lightyear.
There may be circumstances where you assign a certain supplier with a different tax rate to the defaults you have set in Accountancy Settings.
To give a Supplier a different tax rate, go to Suppliers > Select Supplier > Edit. Scroll down to the Supplier Rules area and choose a Default Tax Code from the dropdown list.
Please Note: You can only set one default tax rate. If you set a taxable rate as the Supplier default, the Default Tax Free rate set in Accountancy will continue to apply if there's a non-taxable item on the document.Categories
Within Lightyear, you can select Departments and/or Cost Centres. If these are turned on, upon connecting to iplicit, these will be imported across to Lightyear.
If you make any updates to your Categories within iplicit, you can go to Accountancy > Departments/Cost Centres and click the Import from iplicit button  to update and refresh your list.
Rounding
Lightyear will calculate Unit Price, Line Amount and Tax Amount to 2 decimal places to match the rounding logic that iplicit uses. Because of this, you may see rounding bells  next to the Tax/Total if your supplier is calculating to 3 or more decimal places. Be sure to click the red rounding bell to automatically add rounding rows to match the Lightyear calculation to the total on the bill.
Warning: Grouped Data may display some rounding inconsistencies and can result in discrepancies in calculations when exported into iplicit. We would recommend not using Grouped Data in these scenarios.If you are seeing a discrepancy on the Tax but no rounding bell, make sure you are using Amounts Are: Tax Exclusive, as this is likely to match what the supplier is calculating to on the bill.
Migrating Software?
Once you select iplicit as your software, you won't be able to change it. If you are thinking about changing accountancy software, please reach out to our Support team for guidance on how to do so.
Check out our
to stay up to date
Related Articles
AccountsIQ Integration Setup Guide
Connecting to accountsIQ Setting up and connecting Lightyear to accountsIQ is a quick and easy process. From the left hand ribbon, head over to Settings > Accounting Software > Select accountsIQ > Connect. A popup will display asking for a User Key ...Xero Integration Setup Guide
Connecting to Xero Because Xero and Lightyear are both cloud-based, set-up and connectivity between the two systems is seamless. Here's how. From the Navigation Pane, head over to Settings > Accounting Software > select Xero from the dropdown menu > ...Fuelsoft Integration Setup Guide
Lightyear allows you to export your bills in a pre-set CSV format, which can then be uploaded directly to Fuelsoft. To get started, head to the Accounting Software section of Lightyear and select Fuelsoft from the drop down. Once done, you'll need to ...Netsuite Integration Setup Guide
Make sure you're logged into NetSuite as an admin There's quite a few steps required to get your NetSuite integration up and running, but this is only a one time set up and will not need to be completed again unless you wish to connect another ...Sage 300 Integration Setup Guide
Lightyear allows you to export your bills in a pre-set XLXS format, which can then be uploaded directly to Sage 300. To get started, head to the Accountancy tab in Lightyear > Under Accountancy Software, select Sage 300. Once done, you'll need to ...