Connecting to QuickBooks Online
Because QuickBooks Online and Lightyear are both cloud-based, the set-up and connectivity between the systems is seamless. Here's how.
From the Navigation Pane, head over to Settings > Accounting Software > select QuickBooks Online > Connect.
You will be redirected to the QuickBooks Online website and be asked to log in to your account.

If you have access to more than one QuickBooks Online company please be sure to connect to the correct QuickBooks Online account. If you have selected the wrong file, please view
this article to disconnect and you can come back to reconnect your QuickBooks Online file again.
Lightyear will automatically sync the following data back from QuickBooks Online which are required to process your payables bills:
- Supplier Cards
- Customers (if setting is switched on and set up in QuickBooks Online)
- GL Codes
- Tax Rates
- Classes & Locations (if setting is switched on and set up in QuickBooks Online)
The name of the QuickBooks Online company will be displayed. Once the connection is established to inform you which account is connected. The connection will remain active even when you log out and back into both systems and any user with Export permissions within Lightyear will be able to export bills to QuickBooks Online.
Syncing of your Lightyear and QuickBooks Online is now complete and you are successfully connected. You may wish to revise your Software Settings in the next section and Import All again
If you do nothing else in this section, please ensure you skip ahead to
set your default tax rates before you move on. Trust us, it will make your life SO much easier moving forward.
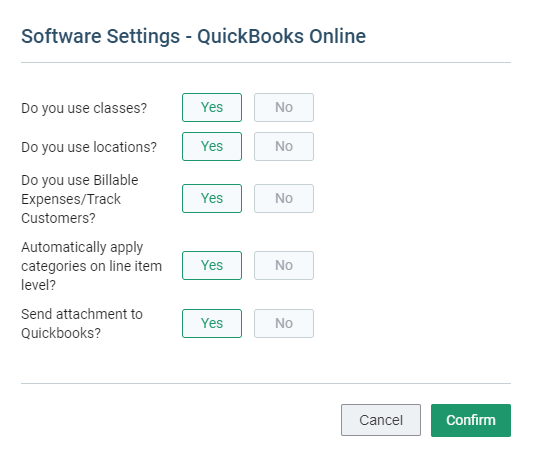
Software Settings
Customise your QuickBooks Online settings by selecting Software Settings. In this section, you can:
- Turn on or off the functionality of using Classes.
- Turn on or off the functionality of using Locations.
- Turn on or off the functionality of using Billable Expenses and Tracking Customers.
- Turn on or off the ability to automatically apply categories on line item level.
- Turn on or off the ability to send attachments to QuickBooks.
Activate Classes/Locations
- For those using Classes/Locations in QuickBooks Online, select Yes to allow Lightyear to code and export these details to QuickBooks Online
- If you do not require classes/locations, you can simply select No
- You could also switch on one and not the other
Read on below for more information on Classes/Locations
Activate Billable Expenses/Track Customers
- For those using billable expenses/customers in QuickBooks Online, select Yes to allow Lightyear to code and export these details to QuickBooks Online
- If you do not require billable expenses/customers, you can simply select No
Read on below for more information on Billable Expenses/Track Customers
Automatically apply categories on line item
- Yes - save time by coding it in Lightyear, and we'll remember the next time we extract the line item what you last coded the supplier lines.
- No - keeps these blank and code them individually
Read on below for more information on this
Send attachments to Quickbooks Online
- Yes - this will send a copy of the document upon export which can be found as an attachment to the bill in QuickBooks Online
- No - this will only send your bill data to QuickBooks Online and not send a copy of the document across to QuickBooks Online upon export

If you choose to send the attachment to QuickBooks Online, keep in mind there is more data to push through so it may take a little bit longer to complete the export
Don't forget to Import All to refresh the connection and bring back your classes and locations again.
How supplier cards work
In Lightyear you have Suppliers. You can name your Suppliers whatever you want. For example, your supplier might be called "Carlton and United Breweries Pty Limited", but you can simply call them using a 'Preferred Name' e.g. "Fosters". Within QuickBooks Online you also have Suppliers, but to avoid any confusion we will refer to your suppliers in QuickBooks Online as Supplier Cards. To illustrate further we will use the below fonts to differentiate between them:
- Suppliers - the Supplier profiles created in Lightyear to house all your rules
- Supplier Cards - your Supplier Cards from QuickBooks Online (also referred to as an Accounting Supplier).
In QuickBooks Online, when you create a new Supplier Card , you can create an alternate Display name for the supplier, as shown in the example below.
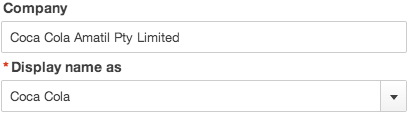
When Lightyear brings back the Supplier Cards , it brings back the "Display Name as" shown.
Before you can export a bill from Lightyear to QuickBooks Online you must first link the Supplier in Lightyear to the Supplier Card . In fact, you will not be able to send a bill to the Signed Off tab in Lightyear without first linking an Accounting Supplier i.e. Supplier Card . When you first connected Lightyear to QuickBooks Online, Lightyear imported all of your Supplier Cards . Therefore, when you create a new Supplier in Lightyear, you can simply associate that Supplier with the Supplier Card from the dropdown list presented to you, as shown below.
If you didn't assign a
Supplier Card when you created the
Supplier in Lightyear, you can assign one by going to

then selecting the
Supplier in question, and clicking Edit to select the
Supplier Card under Accounting Supplier.
Alternatively, if you cannot find the
Supplier Card from the drop down list, check first that they don't exist in QuickBooks Online
. If they do exist in QuickBooks Online
, simply Import from Quickbooks Online again to bring them back into Lightyear. If they don't exist, you can click on the  to create a new Supplier Card and this will create a new one in QuickBooks Online upon export.
 Processing a bill for a new supplier that is not yet set-up in QuickBooks Online
Alternatively, if you cannot find the Supplier Card from the drop down list or perhaps they are a new supplier to your business,
- Firstly, check that they don't already exist in QuickBooks Online
- If they do exist in QuickBooks Online, simply head to Accounting Software > Supplier Cards > Edit > Import from Quickbooks Online to import them into Lightyear
- If they don't exist, you can create a Supplier Card and this will create a new one in QuickBooks Online upon your next export via one of the methods below
- Go to Accounting Software > Supplier Cards > Edit > Add to create a new Accounting Supplier
- Go to Suppliers > Select the Supplier Profile > Create to create a new Accounting Supplier
Some things to note -
You can associate multiple Lightyear Suppliers with the same Supplier Card
If you make changes to the Supplier Card details in QuickBooks Online, your exports from Lightyear to QuickBooks Online will still complete, but for the sake of keeping the two systems sync'd we recommend that you refresh your Supplier Cards from time to time by importing your accounting settings from QuickBooks Online.
GL Code (Chart of Accounts)
Lightyear refers to your Chart of Accounts in QuickBooks Online as GL Codes (General Ledger Codes).
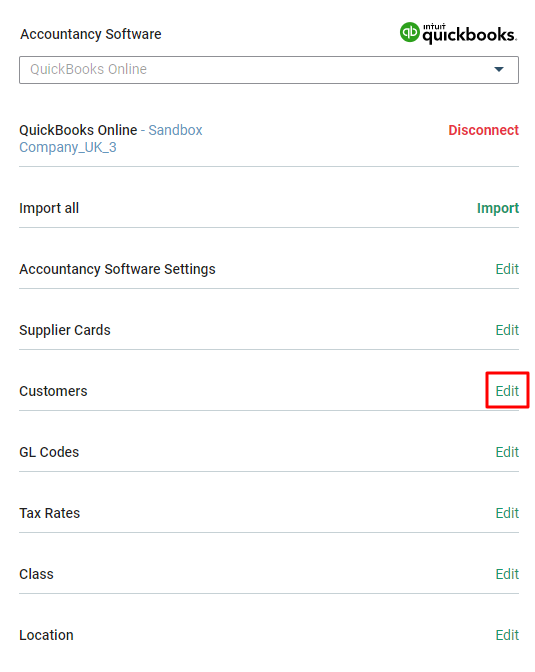
Under Accounting Software > GL Codes > Edit you will see your list of GL codes imported from QuickBooks Online once you've connected. While we will return all codes within your QuickBooks Online file, you will only be able to export documents assigned Expense Type codes. You can select/deselect the checkbox under the In Use column for active/inactive codes respectively. Marking them not in use will mean they don't appear as an option to select when coding from the Approval/Review workflow tabs.
Any new GL Codes added to QuickBooks Online will need to be imported back into Lightyear before being able to export to these. Simply re-sync by clicking "Import from QuickBooks Online".
Don't forget to set a default rounding code and any automatic rounding rows will be auto assigned to this chosen code. See outlined box below.
Set your default tax rates
Once Lightyear and QuickBooks Online have connected, Lightyear imports all of your QuickBooks Online tax rates. Select which of your QuickBooks Online tax rates are to be defaulted for taxed and non taxed items.
This can be set under Accounting Software > Tax Rates > Edit as shown in the image below.
The image below shows what a typical set looks like. We have selected 2 standard tax rates.
 Please Note: UK tax rates shown. Your tax rates may differ to the above depending on your region which would be reflected from your QuickBooks Online file.
Once you have done so, click Save. When Lightyear detects that an item is taxable or non-taxable, it will use these defaults to send with the bill/line-data to QuickBooks Online unless you choose to assign another non-default tax code to the item.
Setting a default tax rate against a certain supplier
Usually the Supplier tax rate is left blank, which allows the 2 defaults set above to work with maps.
But there may be circumstances where you assign a certain supplier with a different tax code to the defaults you have set at company level.
Go to the Suppliers > Select Supplier > Edit. You can then choose to set a default tax rate from the drop-down list.
More about Billable Expenses & Customers
As mentioned above, you can switch this feature on if you're using this in QuickBooks Online. You will then be presented with an extra fields as below
When you have done this, you'll still need to import your Customers to Lightyear. You can do this by selecting Import All - this will import across everything from the above fields, or go into Customers and click Import Customers from Quickbooks Online to import these only.
Billable & Customers
Both Billable and Customers can be assigned at an invoice/bill level, or at a line-by-line level.
If you want to create a new Customer, you need to do so in QuickBooks Online. It should also be noted that if you need new Customers, in QuickBooks Online you can import the new ones to Lightyear via Accounting Settings as described above.
You do not need to set Billable or a Customer - they are not mandatory fields. However, if you choose a line to be Billable, it will require a customer.
In order to check the Customers that are assigned against each row of a bill, go to the top of Panel 2.
In the example below, you are looking at a section of Panel 2 in the Approval Tab. You can do this in Panel 2 of either the Approval Tab or the Review Tab.
In the far right hand column, Billable, several of the rows has been ticked to indicate they are billable and the Customer has been set to "Adwin Ko" on each of these ticked lines.

Once you have the Customers set, you must click Save Changes.
More about Classes & Locations
As mentioned above, you can switch this feature on if you're using this in QuickBooks Online. You will then be presented with an extra two fields as below
When you have done this, you'll still need to import your Classes/Locations to Lightyear. You can do this by selecting Import All - this will import across everything from the above fields, or go into Classes or Locations and click Import from Quickbooks Online to import these only.
If you have Classes/Locations that you won't be using in Lightyear, you can set these to Inactive by deselecting them via the "In Use" checkbox.
Note: having a large number of active Classes/Locations could degrade the app performance, so if they're not in use at all, best to mark inactive from your QuickBooks Online file. Marking them not in use in Lightyear simply hides the option for those who code for Classes/Locations.
Classes
Classes can however be assigned either at an invoice/bill level, or at a line-by-line level.
If you want to create new Classes/Locations, you need to do so in QuickBooks Online. It should also be noted that if you add new Classes/Locations in QuickBooks Online you can import the new ones to Lightyear via Accounting Settings as described above.
Locations
Please note, you can only assign a location at invoice/bill level, not at line level. These are the conditions set as per QuickBooks Online rules.
You do not need to set a Class or a Location - they are not mandatory fields.
In order to check the Classes/Locations that are assigned against each row of a bill, go to the top of Panel 2.
In the example below, you are looking at a section of Panel 2 in the Approval Tab. You can do this in Panel 2 of either the Approval Tab or the Review Tab.
In the far right hand column, Class, one of the rows has been assigned to the "Planet" and the Location has been set to "4. Mars".
Once you have the Classes and Locations set, you must click Save Changes.
More about Automatically Applying Classes/Locations
By switching this on, Lightyear will remember the Classes and Locations you have previously selected, and automatically apply these the next time the invoice is received in the Approvals tab.
This can be set as a supplier default, meaning one Class/Location will be selected for all lines of an invoice, or it can be set on a line-by-line basis, based on the product code.
To set as a supplier default, go to your Supplier, and under the Class/Location fields, select the required option from the dropdown:
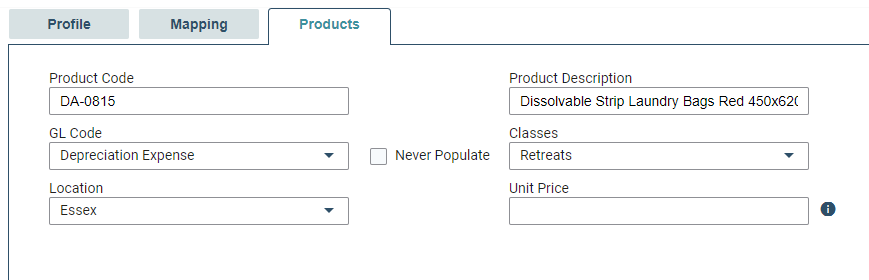
To set on a line-by-line basis, go to your Supplier > Products. Click the green pencil on the item you want to edit, and under the Class/Location fields, select the required option from the dropdown:
Support for multi-currency exports
Whatever currency is on the bill we can export that to QuickBooks Online. Ensure the supplier card setting in QuickBooks Online is set to the same currency extracted from the bill. QuickBooks Online will be expecting the currencies to match their supplier settings or else you'll be presented with an error.

