Statements - How to Reconcile
Automatic Supplier Statement Feature allowing you to file & automatically reconcile your supplier statements, making reconciliation a breeze.
What's more, if there are any missing documents on your statement, you can automatically email your supplier from within Lightyear with a click of a button to request copies of the missing invoices,
Magic!
Let's see how it works....
Automatically Reconciling Statements
Lightyear has the ability to automatically extract data from statements. To do this, you follow the usual Lightyear procedure of finding a map and applying a map. Make sure to choose 'Statement' as the type in the search box. If no map is available for that supplier, please request a 'Map4me' via the blue map4 me button.
Searching for an Existing Map
Chances are, a Map for your Statement already exists, and you just need to apply it! The process for this is exactly the same as mapping a bill.
- From the Processing Tab, select the Statement and hit the 'Find Map' button
- In the pop up, search for the supplier using either the supplier name or ABN (Or the Map ID if you already know it)
- If the supplier exists in Lightyear, you'll be given a list of maps to choose from. Look for Statement maps
- If you find one, select Try Map, and then Apply Map if you're happy with the results. Just like mapping a bill
No Map Found
If a Statement Map for your supplier hasn't been created yet, hit the blue Map For Me button after searching to send off a request, and we will create one for you. Keep an eye on your Unknowns over the next 24 hours (although usually much less) for that green check mark to let you know that a map has been created and is ready to be applied.
Once a map has been applied, your Statements will be filed in the Statements section of the app.
Applying a Map
Once you have successfully applied a map to a statement, the statement will transition through to the Statement Tab. Please note, a credit will be deducted each time a statement transitions to the Statement Tab.
Once a map has been created and applied to a statement, Lightyear will automatically present the correct bills for this supplier statement. We'll search for bills that match based on 3 pieces of key information
- Bill Number
- Bill Date
- Bill Total
Lightyear will then match bills in your system to the statement and mark each bill as either Matched, Partial Match or Missing. Let's take a look at an example statement.
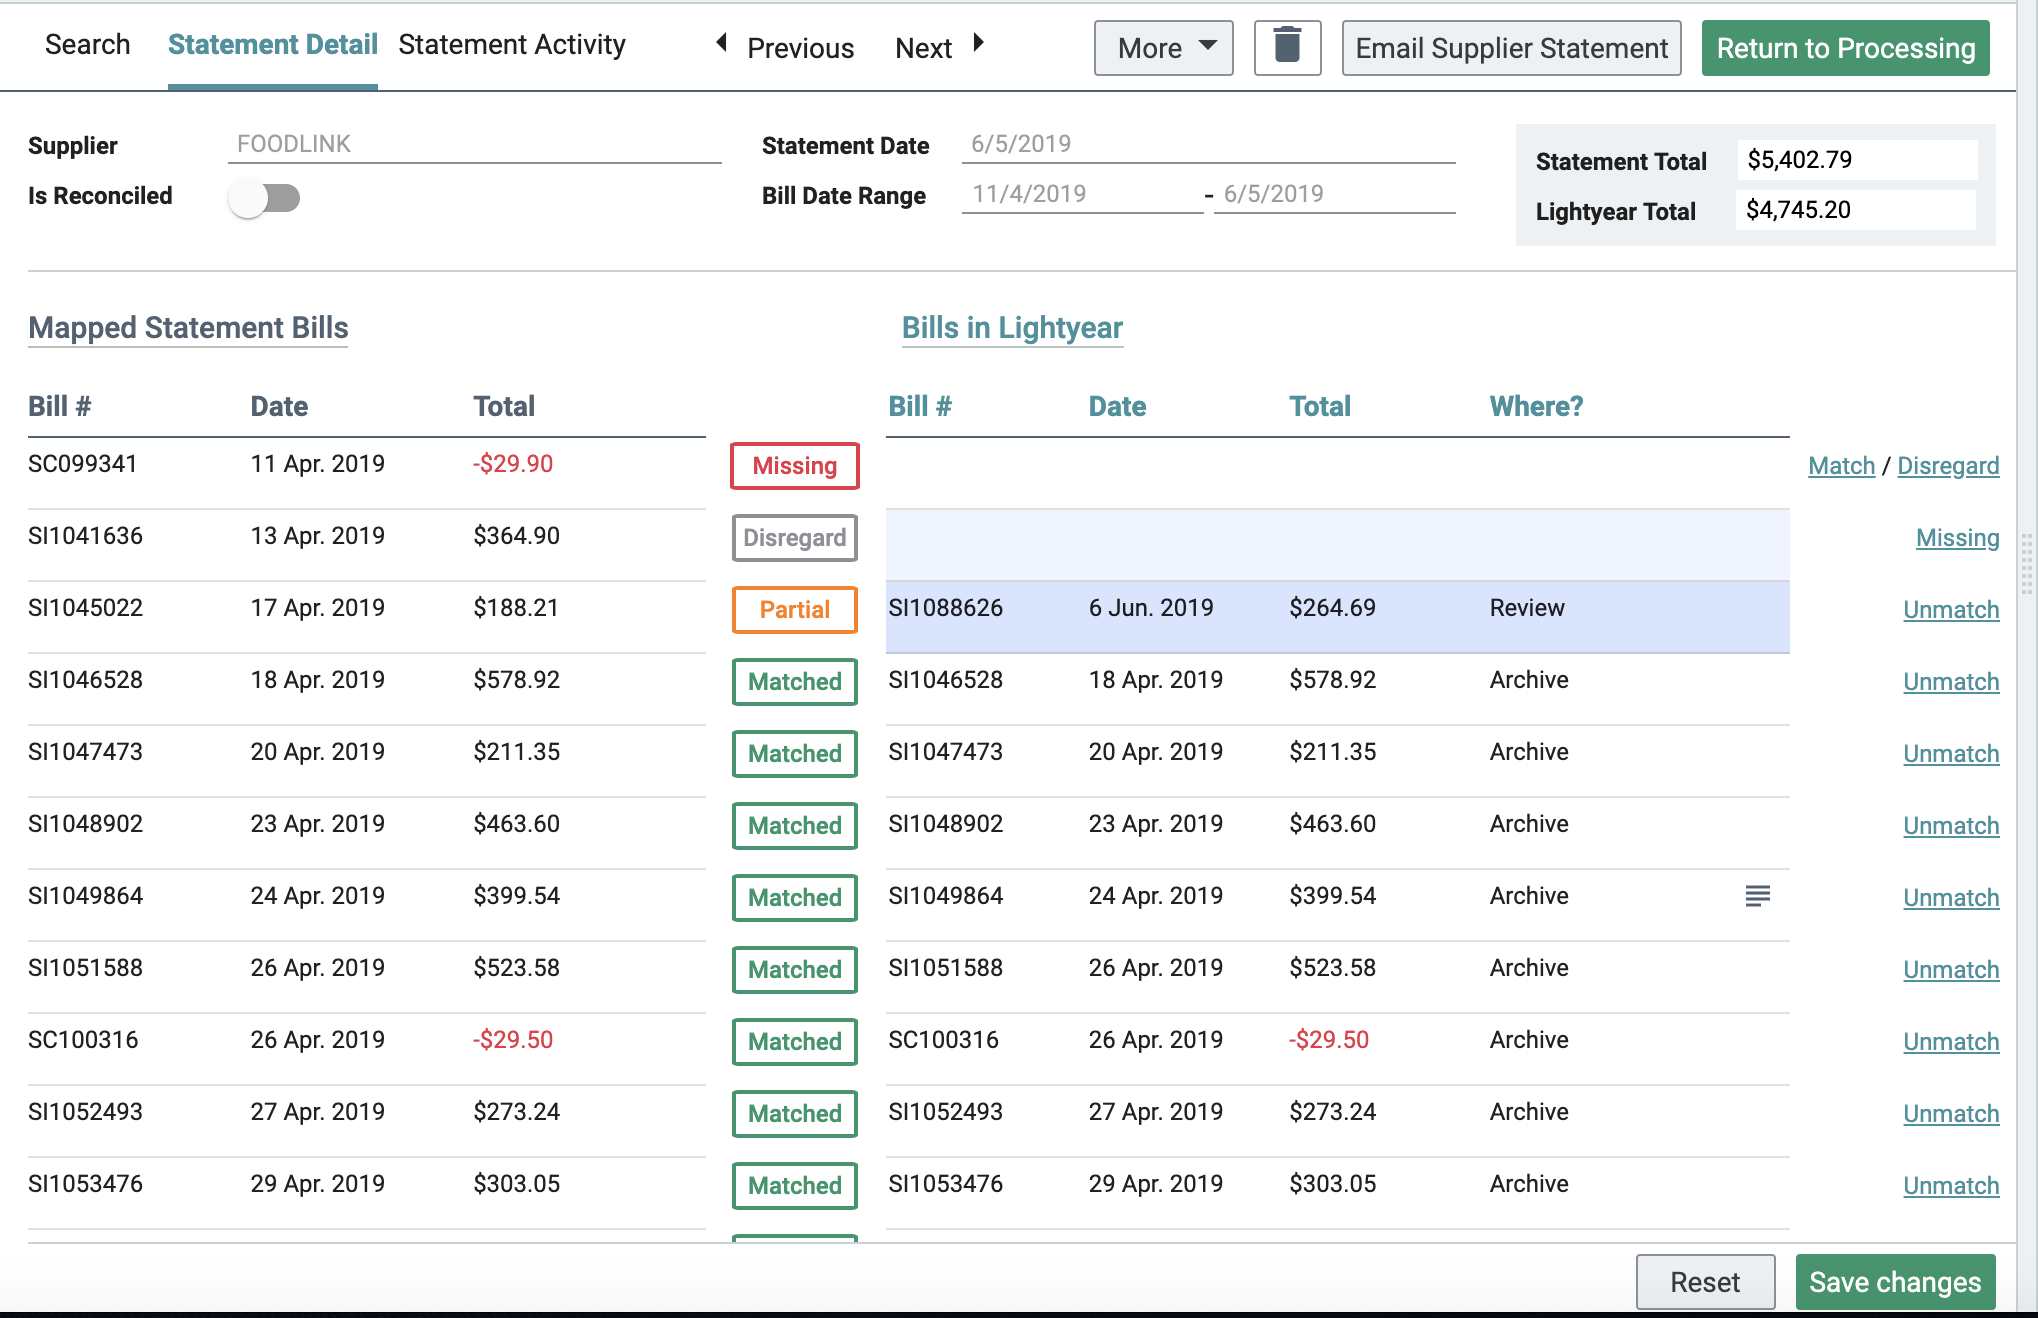
Along with the statement details along the top, you'll also see individual lines for each bill on the statement, and a status for each. These are:
- Matched: Lightyear has found a bill with the same bill number, bill date and bill total as a bill listed on your statement.
- Partial Match: Lightyear has found a bill that matches on some of the key information needed.
- Missing: Lightyear can't find a bill.
- Disregard: User has chosen to disregard that line item.
Reconciling Variances
If a bill is Missing, you can use the Match button to the left of the line to manually search for the bill in Lightyear
You can search for the bill number within a specific date range, and you can add a variance Amount, in case the amount on the bill differs from the amount shown on the statement. Once the bill is found, hit the green Match button. You can also Disregard a bill entirely, if you don't need it to be reconciled on the statement.
Whenever all the bills have been matched, or if they haven't but you're still happy to reconcile the statement anyway, you're good to go ahead and mark the statement as Reconciled to file it away using the 'Is Reconciled' switch.
Manually Filing Statements
If you prefer not to automatically reconcile a Suppliers statements, Statements can still be filed and reconciled manually for record keeping purposes, from the Unknowns Tab using the 'Mark As Statement' button (
more on that here).
If you prefer not to automatically reconcile a Suppliers statements, Statements can still be filed and reconciled manually for record keeping purposes, from the Unknowns Tab using the 'Mark As Statement' button (
more on that here).
Emailing Suppliers
If any bills are missing, you can now send an email directly to your suppliers to request a copy of the Missing Bill/credit note. Simply hit the 'Email Supplier Statement' button.

You can customise the note, but the above will be presented by default. If an email address is linked to the supplier, it will automatically populate the External Email Address field, but you can change this and choose to save the email for future use.
Once sent, the supplier will receive an email containing a CSV listing the bills you're missing.
Supplier Statement filing incurs a charge of 1 credit per document that is filed either manually or with automatic supplier reconciliation.
Related Articles
Statements
Statements are a great feature within Lightyear to help reconcile your outstanding Bills and keep a track of reconciled supplier statements. How to file a statement Statements can be filed to Statements Tab from the Processing Tab. Select the ...Bulk Supplier Upload
Similar to how the Product List, GL Code, Supplier Cards, etc. bulk upload works, users can use a CSV to quickly create all Suppliers within Lightyear. The CSV needs to follow a specified layout, as some columns are required, and others need to ...Setting Supplier Card Country Codes
In Supplier Cards, Lightyear can import the Country Codes from your Accountancy Software. There are instances where some Accountancy Software don't store the Country Code, or the Country Code they store is different from Lightyear, e.g. GBR vs GB, ...Step 8: Tell your Suppliers what to do
FOR YOUR TEAM Once your staff have been brought up to speed to the changes re Lightyear, you should now start asking your suppliers to email your bills to your xxxxx@lightyear.cloud account. No-one particularly likes change, but from the very outset ...Uploading Products - Products Catalog and Price Checker
This is a step-by-step guide to uploading Products in Lightyear. There's a multitude of benefits in doing so. You can use this as part of the initial supplier set up to automate line item coding, create your Product Catalogue in PO's so items can ...