Exporting from Lightyear to Fuelsoft
Once the file is exported to Fuelsoft from within Lightyear Signed Off Tab, a CSV file is automatically placed into a Lightyear Folder on your hard drive. This folder will have been set up by Fuelsoft to automatically pull the CSV file into Lightyear every 5 minutes.
Step 1
Once a file has been pulled into Fuelsoft an email(s) will be sent to the designated user(s) advising that a batch has successfully been created
In some instances a second email will be received which outlines the errors/warnings that have been received as part of the import.
The types of warnings/errors you may receive are:
Duplicate File Name (Warning)
Missing Company Node (Error)
Missing Supplier (Error)
Missing GL Code (Error)
Unknown Transaction Type (Error)
Missing Product (Error)
Duplicate Invoice (Warning)
If an error is received you will be required to delete the batch from Fuelsoft, correct the error and then re-extract the relevant file from Lightyear.
Step 2
A file will then be placed in the AP Invoice Input program which will contain all of the invoices that we in the batch.
You can then go in to the batch to review the documents that are in there if required.
It is important that you double check the total number of documents in the batch import matches the number you exported from Lightyear to cross reference the file is correct.
Step 3
As is normal with Fuelsoft processes, as the batch is imported and created automatically it is placed on hold until released. Therefore, a user will need to unlock the batch by selecting the Unlock option.

Step 4
Once the batch has been reviewed and unlocked you are then able to post the batch. In Fuelsoft navigate to AP Invoice Posting, select the Invoice document type and then select the Lightyear batch of invoices and click update.
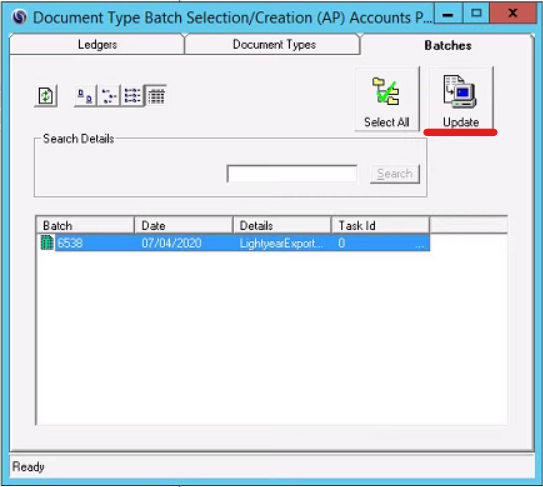
Step 5
A document has now been posted to the suppliers account in Fuelsoft. If you navigate to AP Account Enquiry you can now view a copy of the supplier invoice from within Fuelsoft.
If you locate the transaction and select the view option shown below you will be taken to the Lightyear system where you will be able to log in and view or print copies of the supplier invoices.
Exports and Nominal Codes
When exporting from Lightyear, Fuels will default to grouping nominal codes together in the export file. For exports that have an invoice with multiple GL's, a little tweaking must happen at the Fuelsoft end. If this is the case for you, please get in touch with your point of contact in Fuelsoft as some details and settings will need changed for you, in order to export as desired.

Caution
When exporting you must ensure that the setup in Lightyear has all of the Nodes, GL and Supplier information matching exactly with the data in your Fuelsoft details. If an O (letter) is typed in as 0 (numerical) in your nodes for example, this will block the import to your Fuelsoft system.
Refrain from opening the CSV to check the data. Doing so will likely drop leading zeros from data automatically in Excel or any other CSV software. Use Text or Notepad to review your information.
My Export is not showing in Fuelsoft
If your export does not show in Fuelsoft when you export a batch but has exported as a csv successfully from Lightyear, there are a few things to check.
Is the CSV in the correct Folder for Trawling?
When your cv is downloaded, you need to either manually move that csv batch export to your designated Fuelsoft folder, or set up a location for the csv files to automatically go to.
We will cover both of these actions below. If the csv file is simply downloaded and sitting in your download folder it will not make it to Fuelsoft.
Fuelsoft have set up a designated location on your computers drive to automatically trawl and import any csv files from lightyear and place them into Fuelsoft.
Setup Download Location
In order to set up automatic download locations you need to tweak some settings on your browser.
For Chrome:
Click on the three small dots to the top right of your Browser Screen.
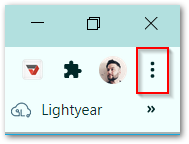
Navigate and click on settings
In the Settings Window, scroll down until you see Advanced.
Click to open more options and scroll to Download Location:
You have 2 options here.
(1) Clicking Change will mean that you allocate a specific folder for ALL downloads.
(2) Enable "Ask where to save each file before downloading" will ask you each time, where you want the download saved.
With option (2) you will want to select the download location that will hold you batch export csv files for trawling.
using option (1) will mean that everything saved on this computer will save to the chosen location. This is not a great idea if you are going to be downloading more than just csv files from lightyear as everything will save here.
Usually the folder that you want to save to is under you drive (:*) > Lightyear> Archive.
Check on your Supplier Data
If your supplier data does not match in Lightyear to what it is set as in Fuelsoft, you will be unable to export/import.
To check supplier details, while in Lightyear, click the cog icon to the left of your screen to open the settings icons (if not already showing) Then Select the accountancy settings icon:
In the Accountancy Settings screen, click on you Fuelsoft Suppliers tab:
When this is selected, the suppliers that you imported are shown. Any that are added after the original import i.e new suppliers must be added in Fuelsoft first and the correct supplier info added to Lightyear here.
In this example, you can see where the supplier name has been added twice rather than the supplier number. This will cause the export to be unsuccessful. All supplier data must match exactly for successful export and import with Lightyear and Fuelsoft.
Exporting Description Field
When Exporting from Lightyear to Fuelsoft, you have the ability to export the Description Field. This field is manually populated by yourself, the user with whatever description is needed. Once the Ref has been updated, it will show on the "description" header field under Column C on your CSV export.
The Description field is available to populate manually from the approvals tray and review tray if using double approval workflow. If left blank, the header row for that invoice in description field will be blank in Column C (both examples are shown below).
The Description field is found in Panel 2. Edit Bill> Description
If populated, export shows as:
If blank, export shows as:


