Create PO and GRN via CSV
If you create Purchase Orders and Good Received Notes outside of Lightyear via a CSV, you can import these directly to Lightyear in bulk action.
If you use any of our other CSV import routines e.g. Bulk Supplier Upload, Product Lists, etc., this will be a familiar routine.

Scroll to the bottom of this Article to view Template CSVs for both PO and GRN imports.
Create PO via CSV
Within the Purchase Orders workflow, click the dropdown arrow next to Create PO and select CSV Create PO.
Select your file from your Documents. Within the popup modal, select Yes or No depending on how your CSV is formatted. If the first row is the Header row, select Yes. If not, select No. Encoding can usually be left as the default. If there are any special characters in the CSV, you may want to consider changing the Encoding.
CSV Layout
The next modal is the most time consuming part of this import process, but it’s worthwhile taking the time to get this correct. Otherwise, you’re at risk of your data being imported in the incorrect format.
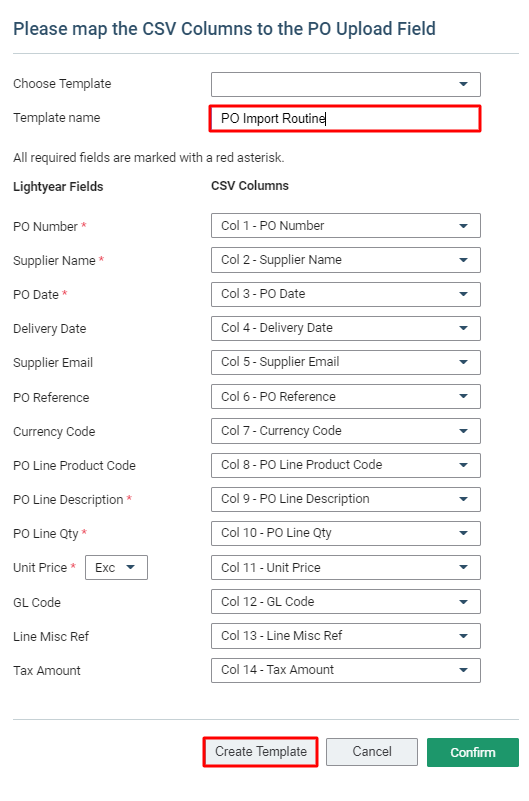
Below is an explanation of the columns you can import to Lightyear. Not all columns are mandatory, but those with a * will be required:
*PO Number: The reference of the PO within Lightyear. When creating POs in Lightyear, we assign a Prefix to the number. If you enter ‘1000’ as the PO Number on the CSV, this will go into Lightyear as ‘1000’, without the Prefix. If a Prefix is needed for your POs, this will need to be entered on the CSV.
*Supplier Name: The name of the Supplier the PO is for. This can be an exact match to what is stored within your Lightyear account, or close to allow a match to be made. More info about this below.
*PO Date: Written in dd/mm/yy format. This is the date the PO is being raised on.
Delivery Date: If known, the date the goods on the PO are to be delivered
Supplier Email: When ordering a PO, if you would like to email the supplier directly from Lightyear, this email address is where the email is sent to
PO Reference: The Reference field on the PO - can be used to store extra information related to the PO.
Currency Code: The currency of the PO. This can only be 3 characters in length, which will be the currency code e.g. AUD, NZD, GBP, EUR, etc.
PO Line Product Code: The product code relating to each line item of the PO. This isn’t a required field, but one PO can have one line with a Product Code and one line without.
*PO Line Description: The description of the line item of the PO.
*PO Line Quantity: The quantity of the line item of the PO.
*Unit Price Incl/Excl: The unit price of each line item. On the CSV this can be entered as either Including or Excluding Tax. When importing the CSV, make sure to select the Incl/Excl using the dropdown menu next to this field.
GL Code: The GL code relating to each line item. From the list of GLs imported to your Lightyear account, use the GL Code in this column.
Category 1: The Category 1 code relating to each line item. From the list of Category 1s imported to your Lightyear account, use the Code in this column.
Category 2: The Category 2 code relating to each line item. From the list of Category 2s imported to your Lightyear account, use the Code in this column.
Line Misc Ref: Any extra information related to each line item.
Tax Amount: The numeric value of tax on each line item. Entering a value into this column will apply the default tax rate set at the Supplier or Company level. If the tax amount entered here is incorrect, upon being imported to Lightyear, this will be corrected automatically.

Please Note: If one PO has multiple line items, enter the same Supplier Name and PO Number on multiple lines on the CSV. When this is imported to Lightyear, one PO will display the correct amount of line items.
We will match the supplier name extracted from the PO to a Supplier within your Lightyear account and automatically apply this on your behalf. If we don't find a match, the PO will remain within Processing for you to create a new supplier, or manually match to an already existing supplier.
The match used is based off a pre-existing matching logic. If 87% or more of the characters extracted from the supplier name on the PO match a supplier existing within Lightyear, we will automatically match these for you.
Once you have the columns in Lightyear matched to the columns of the CSV, click Confirm. This will begin the import process. You will see the below screen while these are importing, don't click away!

Once the import is complete, head over to the location of the import to see the files that were successfully imported.
After each import you will receive a CSV in return, detailing which lines were successful and which were unsuccessful. Check this CSV to make sure everything has imported successfully. Those which failed will need to be adjusted on the original CSV and re-imported using the above instructions.

Saving a Template
When completing this CSV routine, you can save a template to remember which field names match to which column. The next time you need to create another PO via CSV, this template can be selected and the information auto-populated in the correct fields for you to import.
To create a template, go through the above steps to import your CSV. When you have filled out the relevant fields, go back to the top and enter a Template Name, then click the Create Template button at the bottom of the modal.
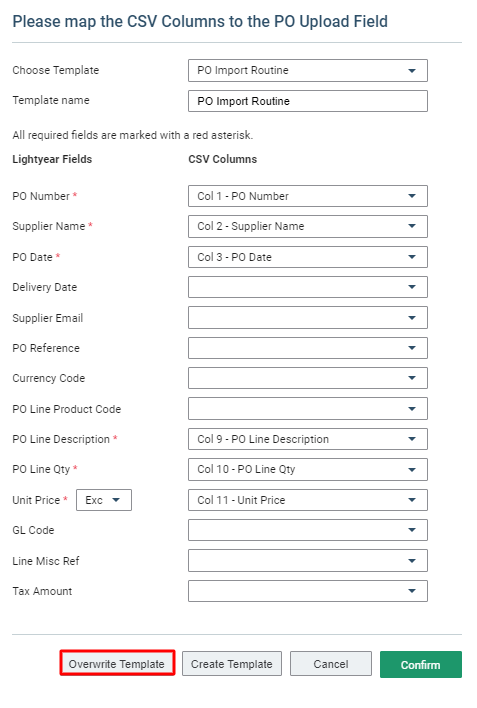
Once this has been Created, the next CSV Import will allow you to select the template from the Choose Template at the top of the modal.
To make changes to the Template, select it from the Choose Template field and make the necessary changes to the fields and click Overwrite Template at the bottom of the modal. These changes will be saved and available to use during the next CSV Import.
To delete a Template, select from the Choose Template dropdown, and click the red X beside the template name.
Where is my Imported PO?
If you go to Company Settings > Purchase Orders, scroll down to the PO Extraction section.
By default, POs will be imported to the Ordered tab, but this can be changed by clicking the dropdown menu and selecting Pending Approval, Approved or Ordered.
Create GRN via CSV
Within the Purchase Order Workflow, click the dropdown arrow next to Create PO and select CSV Create GRN.
Select your file from your Documents. Within the popup modal, select Yes or No depending on how your CSV is formatted. If the first row is the Header row, select Yes. If not, select No.
CSV Layout
The next modal is similar in format to the PO Import, but with less fields. It's still important to take the time to ensure the columns match up between the CSV and Lightyear.
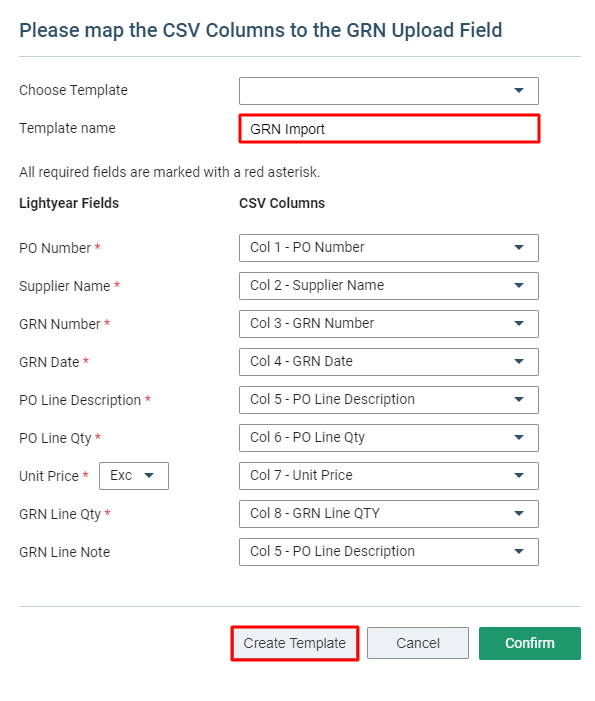
Below is an explanation of the columns you can import to Lightyear. Not all columns are mandatory, but those with a * will be required.
*PO Number: The PO Number of the PO this GRN is being created against. Must match exactly with what is in Lightyear.
*Supplier Name: The Supplier of the PO this GRN is being created against. Must match exactly with what is in Lightyear.
*GRN Number: The GRN Number of this GRN line. If a GRN already exists for a PO, this number must be different from what's already in Lightyear.
*GRN Date: The date of this GRN.
*PO Line Description: The PO description the GRN is being created against. Must match exactly with what is in Lightyear.
*PO Line Qty: The quantity on the PO line the GRN is being created against. Must match exactly with what is in Lightyear.
*Unit Price Incl/Excl Tax: The unit price of the PO line. The CSV must hold a numeric value only. Including or Excluding Tax is chosen through the dropdown menu in the popup modal. Must match exactly with what is in Lightyear.
*GRN Line Qty: The quantity received on this GRN.
GRN Line Note: A note that can be left against each GRN line. An optional field.
Please Note: If are uploading multiple GRN lines per PO, the GRN Number and Date must be the same on each of the lines.
Once you have the columns in Lightyear matched to the columns of the CSV, click Confirm. This will begin the import process. You will see the below screen while these are importing, don't click away!
Once the import is complete, you'll see the Received icon updated to include the new GRN information.
View the GRN to see the exact information that has been imported. This will match what is on the CSV.
After each import you will receive a CSV in return, detailing which lines were successful and which were unsuccessful. Check this CSV to make sure everything has imported successfully. Those which failed will need to be adjusted on the original CSV and re-imported using the above instructions.
Saving a Template
When completing this CSV routine, you can save a template to remember which field names match to which column. The next time you need to create another GRN via CSV, this template can be selected and the information auto-populated in the correct fields for you to import.
To create a template, go through the above steps to import your CSV. When you have filled out the relevant fields, go back to the top and enter a Template Name, then click the Create Template button at the bottom of the modal.
Once this has been Created, the next CSV Import will allow you to select the template from the Choose Template at the top of the modal.
To make changes to the Template, select it from the Choose Template field and make the necessary changes to the fields and click Overwrite Template at the bottom of the modal. These changes will be saved and available to use during the next CSV Import.
To delete a Template, select from the Choose Template dropdown, and click the red X beside the template name.
Check out our
to stay up to date
Related Articles
Receiving goods against your Purchase Orders
Goods Received Notices (GRN) Once you've sent your Purchase Order, the next step is to receive the goods! This can easily be done in Lightyear which allows for 2 way or 3 way matching. Simply head over to the Ordered tab and select your Purchase ...Creating Purchase Orders
So you're ready to create your first Purchase Order. Check out this video on Creating POs or read on below to guide you through the process. To Create a PO, click the " Create PO" button to the top right of your PO screen. You will then see the ...Auto-Order Purchase Orders
If you're familiar with our Auto-Approve feature, you can use the same functionality to automatically Order your Purchase Orders within Lightyear. When enabled, this will move your POs into the Ordered tab and automatically email the relevant ...Purchase Order Workflow
You've filled out your purchase order details and now you need to choose your next action. See your options below to decide the best action for your workflow. We will run through the tabs individually to give you an idea of why they are there. ...Creating a Custom Prefix for Purchase Orders
Lightyear automatically defaults all Purchase Order Numbers to default to PO as a prefix. If you want to create your own Prefix, or use multiple Prefixes, you can do so by following these steps. Creating a New Prefix Head over to Company Settings > ...