Azure Active Directory SSO set up
Set-Up Steps
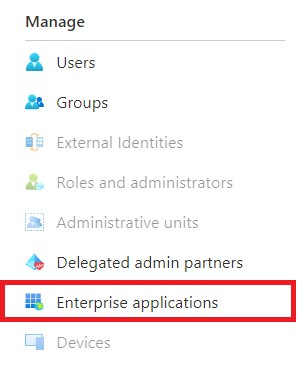
Open your Azure AD and select Enterprise applications
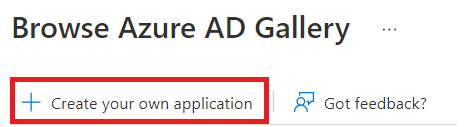
Click New application
Click Create your own application
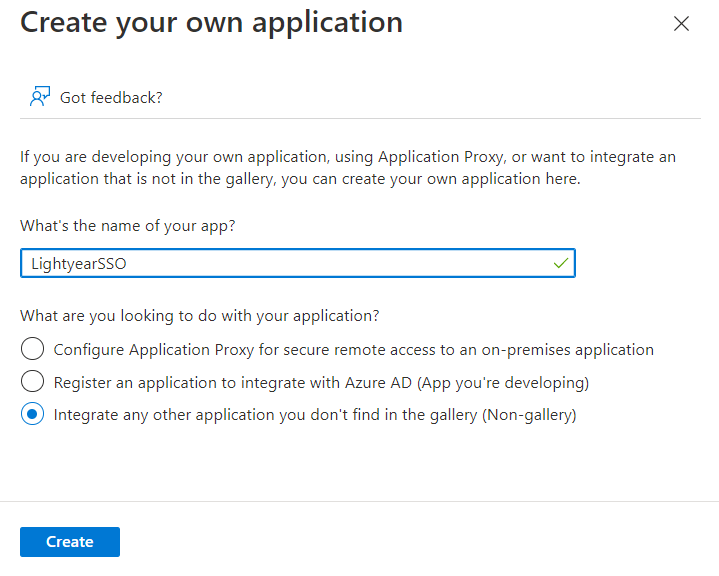
Add a name for your app and ensure Integrate any other application you don't find in the gallery (Non-gallery) is selected and click Create
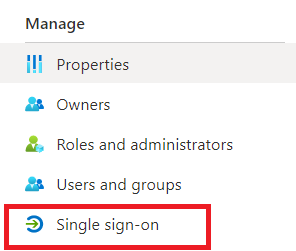
Click Single sign-on in the navigation bar
Click on SAML to select SAML as the single sign-on method
Edit the Basic SAML Configuration and enter these details then Save:
Identifier: urn:amazon:cognito:sp:us-west-2_QKp3VycRu
Reply URL: https://lightyear-live.auth.us-west-2.amazoncognito.com/saml2/idpresponseSign on URL: https://app.lightyear.cloud/sso-verification
Logout Uri: https://app.lightyear.cloud/loginUnder the SAML Certificates section, copy the App Federation Metadata Url and give this to Lightyear.
At this point you can make any other configuration changes to your application e.g. assigning users.
Final configuration changes are made by Lightyear (on Cognito) upon which a new URL for initiating the SSO flow will be passed across.

Related Articles
Okta SSO set up
Set-Up Steps Open Okta as an admin user, and select Applications from the nav bar 2. Click the Create App Integration button 3. For the Sign-in method, select OIDC - OpenID Connect, then select Web Application for Application Type. Click Next 4. Add ...Step 7: Invite your team
Change Management To ensure a successful Lightyear rollout, it's important you bring your staff on the journey. We recommend you follow the below steps to ensure a smooth transition: Build an Implementation plan - Pick a 'Go-Live' date (we recommend ...Step 2: Set your default tax rates
Set Default Tax Rates Now you've connected your accounting software, here's a quick but significant step - make sure you don't skip this one! Your preferred settings here will save you a lot of time later from coding each line item individually on ...Step 4: Approve and Export your bills
The time has come! Here we'll take you through approving and exporting bills. Your approval workflow is going to depend on how you customise your account settings which is actually our next step. The guide for Step 5 will let you know which user ...Access EVO and Lightyear
What is Access Evo? Access Evo is an AI-enabled software experience that transforms your everyday. It's a unique solution that empowers users to achieve more, giving you the freedom to do what's important. Access Evo aims to give you a single ...