Approvals Tab
Lightyear has a 3 panel layout, and we will always refer to them as panel 1, 2 and 3 as below.
Adding notes to a bill
Approve, Dispute or Trash the bill?
Working out if you should approve a bill.
- The Email tab shows you the email that the bill was received from, and the content of the email. Do you recognize the sender of the bill?
- The Edit Invoice tab shows you the detail that Lightyear has extracted from the bill, and whether the rows of information it has extracted equates to the total shown on the footer of the bill.
Q - Does the sum total of the rows on the bill equal the footer on the bill?
 When the extracted data does not match
 When the extracted data does match
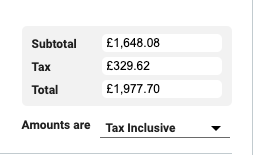
The totals of the rows DO NOT match the extracted data. The totals of the rows DO match the extracted data.
PLEASE NOTE, YOU DO NOT NEED TO RECONCILE/ADJUST WHEN PRESENTED WITH EXCLAMATION MARKS. WHATEVER FIGURES ARE IN THE THREE BOXES (Subtotal, Tax and Total) WILL BE SENT TO YOUR ACCOUNTING SOFTWARE.
PLEASE NOTE, IF THE TAX BOX IS RED (AUSTRALIA ONLY) OR THERE ARE EXCLAMATION MARKS, YOU SHOULD INVESTIGATE WHY BEFORE APPROVING THE BILLS AND EXPORTING THEM TO YOUR ACCOUNTING SOFTWARE.
More Options
Dispute Invoice moves the bill to the disputed tab
Email To Me will email you a copy of the bill
Mark as Unread is self-explanatory
Re-Map Invoice sends the bill back to the unknowns tab to be remapped again. Use this if the data extracted is clearly wrong and always will be. Before using this function make sure to Add a Note to the bill to state why it needs to be remapped. Please remember that it does not send it to us to be mapped.
Send Bill Task allows you to send the bill to another Lightyear user or external person for their approval
Transfer Bill will transfer the bill to another Lightyear account.
Changing settings for the whole bill
To the top of panel 2 you will see some labels for the bill in question - this is Summary bill information.
Supplier
If, for whatever reason, the supplier the bill is assigned to is incorrect, you can change it here.
GL Codes
Before you can approve a bill you need to assign a GL Code to it. If you do not know the GL Code, from the drop down list choose ‘Code Not Known”. This will allow you to approve the bill.
In most instances when you are assigning GL Codes the same GL Code will be applied to the entire bill. But in some instances you may wish to assign different GL Codes across different rows. For more information about Splitting GL Codes see here.
Tracking Categories/Tagging/Categories/Jobs/Classes
Depending on the accountancy software your company uses, and how Lightyear is set-up, you may see another drop-down box under GL Code. Each Accountancy Software calls this functionality something different but you should recognise the label.
You can split these labels in exactly the same way as you split GL Codes. Again, see here
You should refer to the one of the Lightyear Administrators within your company for more information on how they want you to assign and use these labels.
Invoice Number - editable
Invoice Date - editable
Due Date - editable
Purchase Order Number - editable
What you cannot see here are some less commonly used fields. By click on View More Fields , the following will be presented to you
Delivery Date - editable (please note that if you use inventory this will be date that we tell your inventory system you received the goods replacing the invoice date)
Order Date - editable
Shipping Date - editable
Related Articles
Review Tab
Watch this video on the Review Tab Your Lightyear approvals workflow will have a set of tabs running across the top of the screen as follows: Approvals - where bills await approval Review - where approved bills get signed off by another user(s) ...Inventory Tab
Inventory Tab Lightyear allows you to send data to external Inventory, Point of Sale or ERP systems (or if you wanted, a simple spreadsheet). It does this by adding an inventory tab and providing you with the “Add to Inventory” button in Panel 2. The ...Processing Tab
It may sound scary, but it’s not. Watch this video on Processing Bills. The first time a Supplier sends a bill to your Lightyear account, it will appear in the Processing tab. As will scanned documents and statements. The Processing tab can seem ...Customisable Approval Process
If you're looking for more than just data extraction, you're probably looking to advance to streamlining your processes and approvals! Lightyear has a scalable approvals that you can customise and can grow with you as your business grows too. ...Signed Off Tab
Watch this video for a quick run through of the Signed Off tab: The Signed Off tab is where bills stay until you choose to export them to your accounting software. You can export bills in batches or individually, just select the invoices you'd like ...